
Why Is My Vape Cart Not Working? How To Fix Your Vape Pen Carts and Batteries


Why Is My Vape Cart Not Working?
How To Fix Your Vape Pen Carts and Batteries

Introduction
Few things are more frustrating than reaching for your vape pen, expecting a smooth, flavorful hit, only to discover that your vape cart is not working. Whether you’re a seasoned vaper or new to the world of vape cartridges, encountering issues with your device is an all-too-common experience that can leave you feeling confused and disappointed.
Vape cartridges, or “carts” as they’re commonly known, have revolutionized the vaping industry with their convenience, portability, and variety of options. These small but mighty devices have become the go-to choice for millions of users seeking a discreet and efficient vaping experience. However, their compact design and intricate components can sometimes lead to functionality issues that interrupt your vaping session.
When your vape cart is not working, the problem could stem from numerous sources – from simple connection issues to more complex hardware failures. The good news is that many of these problems have straightforward solutions that don’t require technical expertise or expensive replacements. With the right troubleshooting approach, you can often diagnose and fix the issue yourself, saving both time and money.
In this comprehensive guide, we’ll walk you through everything you need to know about why your vape cart might not be working and how to fix it. We’ll explore common issues with both cartomizers (the cartridge portion) and batteries, provide step-by-step diagnostic procedures, and offer practical solutions based on real user experiences and manufacturer recommendations. Whether you’re dealing with clogged airways, connection problems, battery failures, or other common vape cart issues, we’ve got you covered with expert advice and easy-to-follow instructions.
By the end of this article, you’ll have the knowledge and confidence to troubleshoot virtually any vape cart problem, ensuring you can get back to enjoying your vaping experience with minimal interruption. Let’s dive in and solve the mystery of your non-functioning vape cart once and for all.
Understanding Your Vape Pen Components
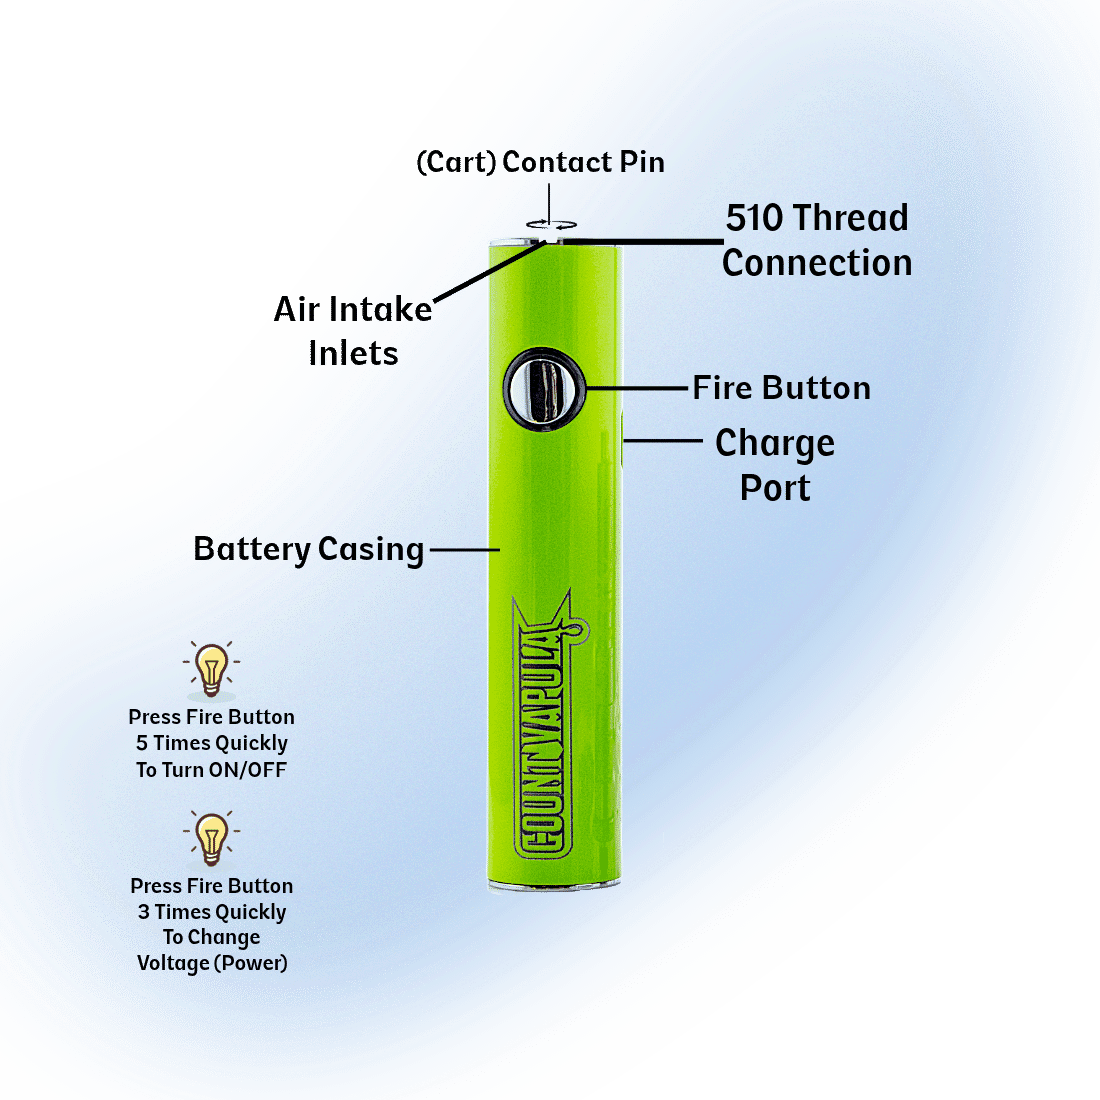
Before diving into troubleshooting why your vape cart is not working, it’s essential to understand the basic components of your vape pen system. Knowing how these parts function together will help you more effectively diagnose and resolve issues when they arise.
The 510 Thread Connection System
At the heart of most vape pens is the “510 thread” connection—the industry standard that allows cartridges and batteries from different manufacturers to work together. The term “510” refers to the specific threading pattern: 10 threads at 0.5mm pitch. This standardization has revolutionized the vaping industry by offering users tremendous flexibility in mixing and matching components.
The 510 connection consists of two parts:
- The male threading on the cartridge (bottom part that screws in)
- The female threading on the battery (the receptacle where the cartridge connects)
This connection serves two critical functions: it physically secures the cartridge to the battery and creates an electrical connection that powers the heating element. When your vape cart is not working, problems with this connection are often the culprit.
Cartridge (Cartomizer) Components
The cartridge, sometimes called a cartomizer, is the component that holds your oil and converts it into vapor. A typical cartridge includes:
-
Mouthpiece: The part you inhale from, usually made of plastic, metal, or ceramic.
-
Tank/Reservoir: The chamber that holds your oil or concentrate.
-
Atomizer/Coil: The heating element that vaporizes the oil. This is the “engine” of your cartridge.
-
Wick: Usually made of cotton, ceramic, or other absorbent material, it draws oil from the reservoir to the heating element.
-
Center Post/Airflow Channel: Allows air to flow through the cartridge when you inhale.
-
Base/Connector: Contains the 510 threading and electrical contacts that connect to the battery.
When your vape cart is not working, issues can occur in any of these components, from clogged wicks to damaged coils or poor electrical connections.
Battery Components
The battery portion of your vape pen may seem simple, but it contains several important components:
-
Battery Cell: The rechargeable power source that energizes the heating element.
-
Activation Mechanism: Either a button (manual activation) or a sensor (automatic activation when you inhale).
-
Control Circuitry: Regulates power delivery and provides safety features.
-
510 Connection: The threaded receptacle where the cartridge attaches.
-
Charging Port: Usually a USB or USB-C connection for recharging.
-
Voltage/Temperature Controls: On variable voltage batteries, allows you to adjust the power output.
Many vape cart issues stem from battery problems, including insufficient charge, damaged connections, or incorrect settings.
How These Components Work Together
When functioning properly, your vape pen system works through a simple process:
-
The battery supplies power to the cartridge’s heating element (coil).
-
The coil heats up, reaching the temperature needed to vaporize the oil.
-
As you inhale, air flows through the system, carrying the vapor from the heated oil.
-
The vapor travels through the mouthpiece and into your lungs.
This process requires all components to be in good working order and properly connected. When your vape cart is not working, a breakdown in any part of this system can be the cause.
Common Terminology Explained
Understanding the terminology used in vaping can help you better communicate issues and find solutions:
-
510 Thread: The standard connection type used by most vape cartridges and batteries.
-
Cartomizer: Combined cartridge and atomizer unit.
-
Atomizer: The heating element that vaporizes the oil.
-
Draw-activated: A battery that activates when you inhale (no button required).
-
Variable Voltage: Batteries that allow you to adjust the power output.
-
Preheat Function: A feature that warms the oil before use, especially helpful for thick oils.
-
Ohms/Resistance: Measure of the electrical resistance in the heating coil.
With this foundation of knowledge about your vape pen components, you’ll be better equipped to diagnose why your vape cart is not working and implement the appropriate solutions in the following sections.
Diagnosing the Source of the Problem
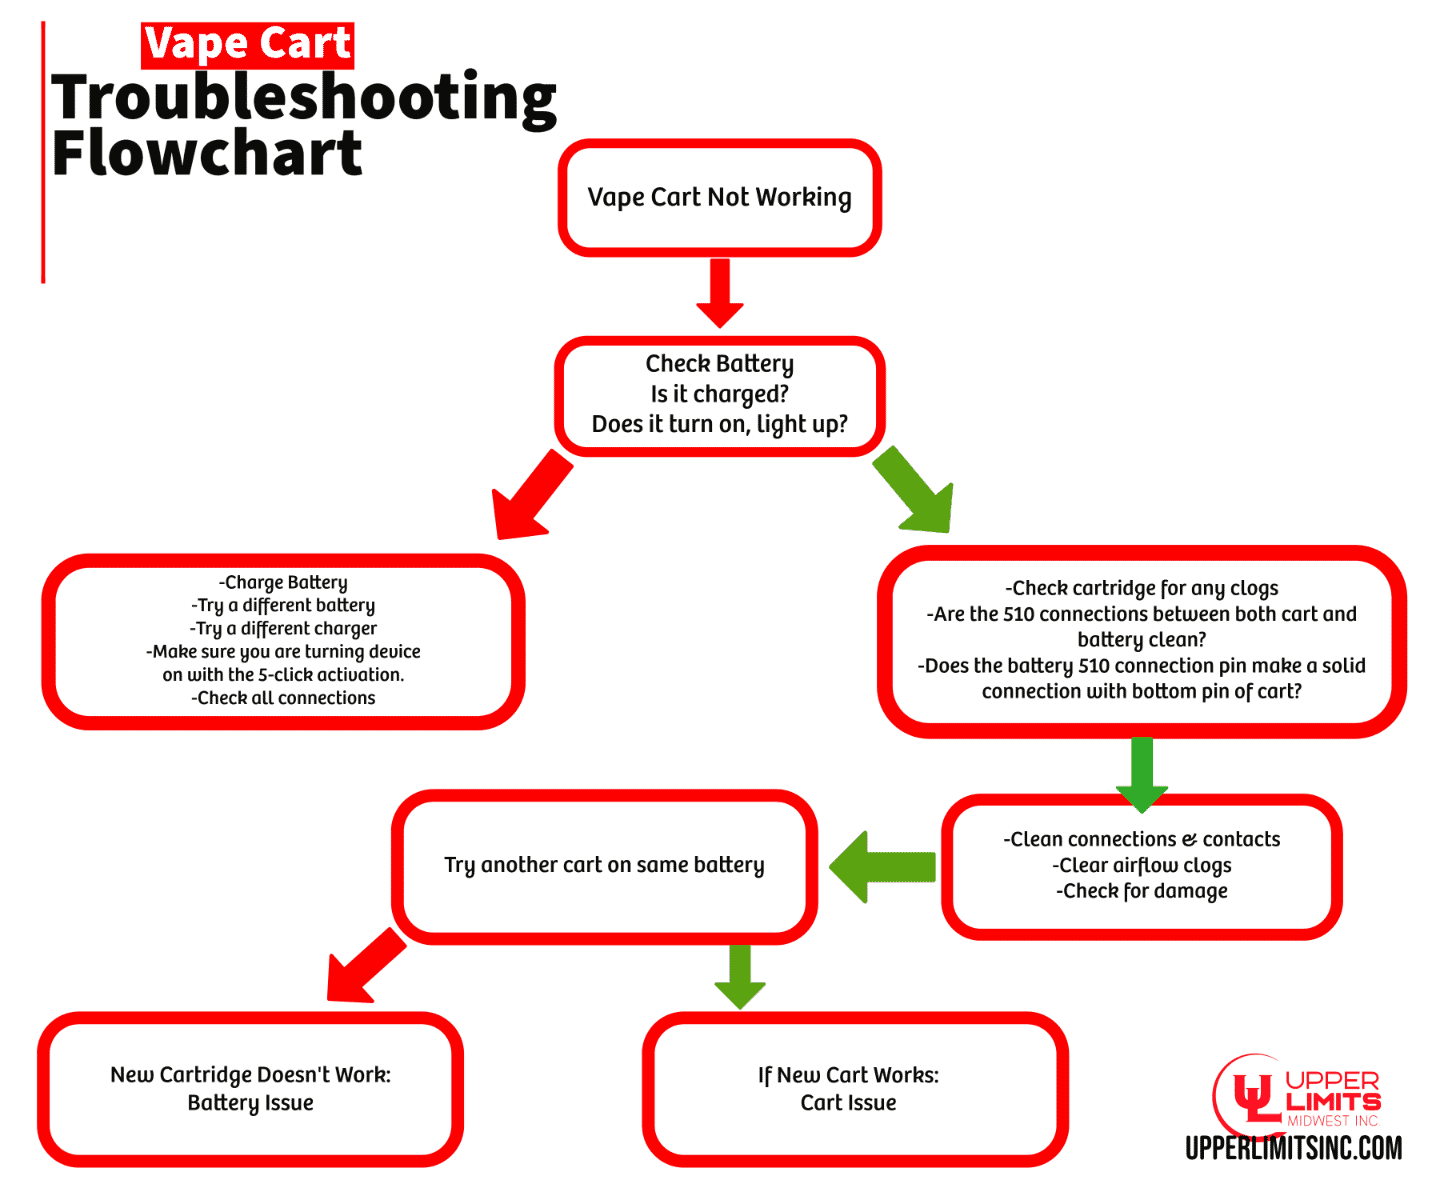
Diagnostic Flowchart
When your vape cart is not working, the first step toward a solution is identifying exactly where the problem lies. Is it the cartridge? The battery? Or perhaps the connection between them? Taking a systematic approach to diagnosis will save you time and frustration, helping you target the specific issue rather than guessing blindly.
Step-by-Step Diagnostic Approach
Follow this methodical process to pinpoint why your vape cart is not working:
1. Visual Inspection
Before anything else, carefully examine your vape pen:
-
Look for visible damage: Check for cracks in the cartridge, leaking oil, or damaged threading.
-
Inspect the connections: Look at the contact points on both the cartridge and battery for dirt, debris, or oil residue.
-
Check the oil level: Ensure your cartridge isn’t empty. Some cartridges may appear to have oil but are actually depleted where it matters—at the wick.
2. Test the Battery
The battery is often the culprit when your vape cart is not working:
-
Verify it’s charged: Most batteries have an indicator light. If it’s not illuminating when activated or when connected to a charger, your battery may be dead.
-
Confirm it’s turned on: Many batteries require five rapid clicks to turn on or off. If your battery has a button, try clicking it five times quickly and look for an indicator light.
-
Check for response: When you press the activation button (if your device has one), does the battery show any signs of life? Look for lights or vibration.
3. Test the Cartridge
If the battery seems to be working, the issue may be with the cartridge:
-
Try a different cartridge: If you have another cartridge available, try it on your battery. If the new cartridge works, your original cartridge is likely the problem.
-
Examine the airflow: Without attaching to the battery, try drawing air through the cartridge. If you can’t pull air through, it may be clogged.
-
Check for connectivity: Look at the bottom of the cartridge where it connects to the battery. Is the center pin visible and clean?
4. Test the Connection
Often, the issue is neither the battery nor the cartridge individually, but how they connect:
-
Clean the connections: Use a cotton swab with isopropyl alcohol to clean both the battery’s connection point and the bottom of the cartridge.
-
Adjust the center pin: Sometimes the center pin on either the battery or cartridge gets pushed in too far. Gently pull it out slightly using a paperclip or toothpick.
-
Try a slight loosening: Sometimes screwing the cartridge on too tightly can prevent proper connection. Try unscrewing it slightly (about 1/8 to 1/4 turn) and test again.
Simple Tests to Isolate the Problem
Here are some quick tests to help determine why your vape cart is not working:
The Battery Test
-
Connect your cartridge to the battery.
-
Press the activation button (if present).
-
Look for an indicator light.
-
If no light appears, try charging the battery.
-
If the light appears but no vapor is produced, the issue is likely with the cartridge or connection.
The Cartridge Test
-
Remove the cartridge from the battery.
-
Examine the bottom of the cartridge for oil residue or debris.
-
Clean the connection point with a cotton swab.
-
Try drawing air through the cartridge without the battery.
-
If air doesn’t flow freely, you likely have a clogged cartridge.
The Connection Test
-
Clean both connection points with isopropyl alcohol.
-
Allow them to dry completely.
-
Reconnect, ensuring the cartridge is secure but not overtightened.
-
Test the device.
-
If it still doesn’t work, try slightly loosening the cartridge and testing again.
Signs That Indicate Specific Issues
Certain symptoms can point to specific problems when your vape cart is not working:
Battery Issues
-
No lights or indicators when activated
-
Device doesn’t get warm when activated
-
Battery feels unusually hot
-
Battery charges but depletes very quickly
Cartridge Issues
-
Gurgling sounds when inhaling
-
Burnt taste
-
Oil leaking from the bottom or mouthpiece
-
No airflow when trying to inhale
-
Visible darkening of the oil near the wick
Connection Issues
-
Inconsistent operation (works sometimes but not others)
-
Battery light comes on but no vapor produced
-
Device works when the cartridge is positioned at certain angles
-
Battery indicates a short circuit (usually rapid blinking lights)
Importance of Systematic Troubleshooting
Taking a methodical approach to diagnosing why your vape cart is not working offers several advantages:
-
Saves time and money: By identifying the specific issue, you avoid unnecessarily replacing components that are actually working fine.
-
Prevents further damage: Some quick fixes can actually cause more harm if applied to the wrong problem. Proper diagnosis ensures appropriate solutions.
-
Builds knowledge: Understanding the specific issues that can affect your device helps you prevent similar problems in the future.
-
Improves vaping experience: Resolving the root cause rather than applying band-aid fixes leads to more consistent and enjoyable vaping.
With a clear understanding of what’s causing your vape cart not to work, you can now move on to implementing the specific solutions detailed in the following sections.
Common Cartridge (Cart) Issues and Solutions

Clog Solutions Diagram
When your vape cart is not working, the issue often lies with the cartridge itself. Cartridges contain several delicate components that can malfunction for various reasons. In this section, we’ll explore the most common cartridge issues and provide practical solutions to get your vape working again.
Clogging Problems and How to Fix Them
Clogging is perhaps the most frequent complaint among vape users. When your vape cart is not working due to a clog, you’ll typically experience restricted airflow or complete inability to draw vapor.
Why Clogging Occurs
-
Oil thickness: Thicker oils are more prone to clogging, especially in cooler temperatures
-
Residue buildup: Vaporized oil can recondense in the airway
-
Improper storage: Storing carts horizontally or in extreme temperatures can cause oil to leak into airways
-
Drawing too hard: Pulling too forcefully can draw excess oil into the airway
Using Heat to Improve Oil Flow
Heat is your best ally when dealing with a clogged cartridge:
-
Preheat function: If your battery has a preheat setting, use it for 2-3 seconds before inhaling.
-
Warm water method:
-
Place the cartridge (not the battery) in a sealed plastic bag
-
Submerge in warm (not hot) water for 1-2 minutes
-
Remove, dry thoroughly, and try again
-
Body heat method:
-
Hold the cartridge in your closed hand for several minutes
-
The natural body heat will warm the oil and improve flow
-
Hair dryer technique:
-
Use a hair dryer on low heat setting
-
Hold it 8-10 inches away from the cartridge
-
Apply heat for no more than 10-15 seconds at a time
Using Tools to Clear Blockages Safely
Sometimes heat alone isn’t enough, and you’ll need to physically clear the blockage:
-
Paperclip method:
-
Straighten a paperclip or use a thin needle
-
Gently insert it into the mouthpiece airway
-
Be extremely careful not to damage the internal components
-
Twist slightly to clear any blockage
-
Suction technique:
-
Remove the cartridge from the battery
-
Cover the bottom connection with your finger
-
Draw firmly (but not excessively) through the mouthpiece
-
Release your finger from the bottom while still drawing
-
This creates a pressure change that can dislodge clogs
-
Toothpick cleaning:
-
Use a wooden toothpick (avoid metal if possible)
-
Gently insert into the airway
-
Twist to remove any visible residue
Preventing Future Clogs
Take these preventative measures to avoid dealing with a vape cart not working due to clogs:
-
Store upright: Always store cartridges in a vertical position
-
Avoid extreme temperatures: Keep carts at room temperature
-
Draw gently: Use light, steady draws instead of forceful pulls
-
Take “primer puffs”: Before activating the battery, take a gentle draw to warm the oil
-
Clean regularly: Wipe the mouthpiece after each use
-
Use appropriate voltage: Lower voltage settings produce less residue
Connection Issues with 510 Thread

Connection Issues Diagram
Connection problems are another common reason why your vape cart is not working. The 510 thread connection is robust but can develop issues over time.
Cleaning Contact Points
Dirty connections are often the culprit when your vape cart is not working:
-
Gather supplies:
-
Isopropyl alcohol (91% or higher)
-
Cotton swabs or microfiber cloth
-
Paper towels
-
Clean the battery connection:
-
Lightly dampen a cotton swab with alcohol
-
Gently clean the threaded connection and center pin
-
Allow to dry completely before reconnecting
-
Clean the cartridge connection:
-
Wipe the threaded area and center pin
-
Remove any visible oil residue
-
Ensure the center pin is free of debris
Adjusting Center Pin
Sometimes the center pin on either the battery or cartridge gets pushed in too far:
-
Identify the center pin:
-
On the battery: the small, spring-loaded pin in the center of the connection
-
On the cartridge: the small pin protruding from the center of the threaded base
-
Adjust the battery pin:
-
Use a toothpick or small flathead screwdriver
-
Very gently pry the pin upward about 1mm
-
Be careful not to damage the pin or surrounding components
-
Adjust the cartridge pin:
-
Use a paperclip or toothpick
-
Gently pull the pin downward slightly
-
Ensure it’s not recessed too deeply
Ensuring Proper Threading
Improper threading can cause your vape cart not to work even when both components are functioning:
-
Check for cross-threading:
-
Ensure the cartridge starts threading smoothly
-
If you feel resistance immediately, stop and realign
-
Find the sweet spot:
-
Some cartridges work best when slightly loosened
-
If your cart isn’t working, try unscrewing it about 1/8 turn
-
This can improve airflow and connection
-
Avoid overtightening:
-
Tighten only until snug
-
Excessive force can damage threads and connections
Oil-Related Problems
The oil itself can be the reason your vape cart is not working properly.
Thick Oil Not Vaporizing Properly
-
Warming techniques:
-
Use any of the heating methods described in the clogging section
-
Preheat function is especially useful for thick oils
-
Voltage adjustments:
-
Thicker oils often require higher voltage
-
If your battery is adjustable, try increasing the voltage slightly
-
Start at the lowest setting and gradually increase
-
Thinning agents:
-
Not recommended for pre-filled commercial carts
-
For self-filled carts, proper thinning agents can be added
-
Always research compatibility before adding anything to your oil
Air Bubbles Preventing Proper Flow
Air bubbles can block oil from reaching the wick, causing your vape cart not to work:
-
Identify bubbles:
-
Look for air pockets around the wick or intake holes
-
These prevent oil from saturating the heating element
-
Disperse bubbles:
-
Gently tap the cartridge against a soft surface
-
Roll the cartridge between your palms
-
Apply gentle heat while rotating the cartridge
-
Prevention:
-
Store cartridges upright
-
Avoid rapid temperature changes
-
Take slower, gentler draws
Oil Leakage Issues
Leaking oil can cause your vape cart not to work and create a mess:
-
Identify the leak source:
-
Bottom connection: usually indicates threading or seal issues
-
Mouthpiece: often caused by overfilling or pressure problems
-
Fix bottom leaks:
-
Clean thoroughly with alcohol wipes
-
Ensure proper threading
-
Check for damaged O-rings or seals
-
Fix mouthpiece leaks:
-
Store upright
-
Avoid exposure to heat
-
Don’t overfill if refilling your own carts
-
Prevention:
-
Store properly (upright, room temperature)
-
Avoid overfilling
-
Don’t overtighten connections
-
Take gentle draws
Damaged or Defective Cartridges
Sometimes your vape cart is not working simply because it’s damaged or defective.
Signs of a Damaged Coil
-
Burnt taste: The most obvious sign of a burnt coil
-
Reduced vapor: Significantly less vapor than normal
-
Discoloration: Darkening of the oil around the wick
-
Inconsistent hits: Works intermittently or produces uneven vapor
-
No vapor despite heating: Battery works but no vapor produced
When to Replace vs. When to Repair
Consider replacement when:
- The cartridge is leaking extensively
- You experience a persistent burnt taste
- The glass is cracked or damaged
- The cartridge is completely clogged despite attempts to clear it
- The connection is damaged or stripped
Consider repair when:
- The clog is minor and accessible
- The connection needs cleaning
- Air bubbles are blocking oil flow
- The center pin needs adjustment
Remember that most pre-filled cartridges are designed to be disposable. While minor issues can often be fixed, significant problems usually warrant replacement, especially considering the potential health risks of using damaged components.
By addressing these common cartridge issues, you can resolve most situations where your vape cart is not working. In the next section, we’ll explore battery-related problems that might be affecting your vaping experience.
Common Battery Issues and Solutions
-
Check Voltage Settings (If applicable)
-
Try Another Cart
-
Clean Connections
-
Turn On (5-Clicks)
-
Charge Battery
When your vape cart is not working, the battery is often the culprit. The battery is the power source for your entire vaping system, and without proper function, even the best cartridge won’t produce vapor. Let’s explore common battery issues and how to resolve them.
Power Problems
Charging Issues
If your battery won’t charge or hold a charge, your vape cart is not working because it simply isn’t receiving power:
-
Check the charging connection:
-
Ensure the charging port is clean and free of debris
-
Examine the charging cable for damage
-
Try a different charging cable if available
-
Verify charging indicators:
-
Most batteries display a light when charging (often red)
-
The light typically changes color (often to green) when fully charged
-
No light may indicate a dead battery or faulty charger
-
Troubleshoot common charging problems:
-
If the battery gets hot while charging, disconnect immediately
-
If the battery won’t hold a charge, it may have reached the end of its lifespan
-
Some batteries have a limited number of charging cycles (typically 300-500)
-
Proper charging practices:
-
Don’t overcharge (remove from charger when full)
-
Use the manufacturer’s recommended charger
-
Avoid charging overnight
-
Don’t use the device while charging
Battery Not Turning On
Sometimes your vape cart is not working because the battery isn’t activating:
-
Activation sequence:
-
Most batteries require 5 rapid clicks to turn on or off
-
Look for an indicator light that blinks or changes color when activated
-
Some batteries have different sequences (3 clicks or 7 clicks)
-
Check for battery lock:
-
Some batteries have a safety lock feature
-
Consult your specific battery’s manual for unlocking instructions
-
Common methods include pressing the button 3 times or holding it for several seconds
-
Reset the battery:
-
Remove the cartridge
-
Turn the battery off (usually 5 clicks)
-
Wait 30 seconds
-
Turn it back on
-
Reconnect the cartridge
-
Dead battery troubleshooting:
-
Connect to a charger for at least 30 minutes
-
If no charging indicator appears, try a different charger
-
If still no response, the battery may need replacement
Verifying Battery is Activated Correctly
Even when a battery appears to be on, it might not be properly activated:
-
Understanding indicator lights:
-
Solid light: Usually indicates the battery is on and ready
-
Blinking light: Could indicate low battery, short circuit, or other issues
-
No light when button pressed: Battery may be off or completely dead
-
Button-activated vs. draw-activated batteries:
-
Button-activated: Must press and hold the button while inhaling
-
Draw-activated: Automatically activates when you inhale
-
Know which type you have to use it correctly
-
Common activation patterns:
-
5 clicks: Turn on/off
-
3 clicks: Change voltage/temperature (on some models)
-
2 clicks: Activate preheat (on some models)
-
Hold button: Standard activation during use
Connection Problems
Cleaning Battery Contacts
Dirty contacts are a common reason why your vape cart is not working:
-
Gather supplies:
-
Isopropyl alcohol (91% or higher)
-
Cotton swabs
-
Paper towels
-
Cleaning process:
-
Turn off the battery
-
Lightly dampen a cotton swab with alcohol
-
Gently clean the threaded connection and center pin
-
Pay special attention to the center pin where electrical contact occurs
-
Allow to dry completely before use
-
Frequency recommendations:
-
Clean contacts every 1-2 weeks for regular users
-
Clean immediately if you notice oil residue
-
Clean when switching between different cartridges
Adjusting Battery Center Pin
The center pin in the battery’s 510 connection can sometimes get stuck or pushed down:
-
Identify the center pin:
-
Look at the threaded connection on your battery
-
The center pin is the small, often spring-loaded, metal contact in the middle
-
Adjustment technique:
-
Use a toothpick or small flathead screwdriver
-
Very gently pry the pin upward about 1mm
-
Be careful not to damage the pin or surrounding components
-
The pin should have a slight spring action when pressed
-
When to adjust:
-
When your battery recognizes some carts but not others
-
When the battery light comes on but no vapor is produced
-
When connection seems inconsistent
Compatibility Issues Between Batteries and Carts
Not all batteries and cartridges work well together, even with the standard 510 threading:
-
Voltage compatibility:
-
Some cartridges require specific voltage ranges
-
High voltage on a cart designed for low voltage can burn the coil
-
Low voltage on a cart designed for higher voltage produces weak hits
-
Airflow design differences:
-
Bottom airflow vs. top airflow designs
-
Some batteries block airflow holes on certain cartridges
-
Ensure airflow holes aren’t covered by the battery design
-
Thread length variations:
-
Though all are “510 thread,” the length can vary slightly
-
Some combinations may not make proper electrical contact
-
Adapter rings are available for incompatible combinations
Performance Issues
Voltage/Temperature Settings
Incorrect settings can cause your vape cart not to work properly:
-
Finding the optimal voltage:
-
Most oils perform best between 2.5V-3.5V
-
Start low and increase gradually
-
Too low: weak hits, poor vapor production
-
Too high: burnt taste, damaged coil, wasted oil
-
Adjusting voltage on variable batteries:
-
Common color codes:
-
Green: Low (2.5-3.0V)
-
Blue: Medium (3.0-3.5V)
-
Red: High (3.5-4.0V)
-
Consult your specific battery’s manual for exact settings
-
Signs of incorrect voltage:
-
Burnt taste: voltage too high
-
Weak vapor: voltage too low
-
Harsh hits: likely too high
-
Oil darkening quickly: too high
Preheat Function Usage
The preheat function can solve many issues when your vape cart is not working:
-
What preheat does:
-
Warms the oil before you take a hit
-
Makes thick oils more fluid
-
Helps prevent clogging
-
Improves vapor production
-
How to use preheat:
-
Typically activated by clicking the button twice
-
Wait for the preheat cycle to complete (usually 10-15 seconds)
-
Take your hit immediately after preheating
-
Don’t overuse preheat as it can waste battery and potentially damage oil
-
When to use preheat:
-
First hit of the day
-
When using thick oils
-
In cold environments
-
When experiencing weak hits
Battery Life Optimization
Extending battery life ensures your vape cart is not working only because of power issues:
-
Charging best practices:
-
Charge before completely empty
-
Don’t leave on charger after reaching full charge
-
Use the manufacturer’s recommended charger
-
Store at 40-80% charge if not using for extended periods
-
Usage optimization:
-
Lower voltage settings use less battery
-
Shorter draws conserve power
-
Turn off when not in use
-
Avoid extreme temperatures
-
Signs of battery degradation:
-
Significantly reduced usage time between charges
-
Battery gets unusually warm during use
-
Needs frequent recharging
-
Inconsistent performance
When to Replace Your Battery
Sometimes the best solution when your vape cart is not working is simply replacing the battery:
-
Signs it’s time for replacement:
-
Won’t hold a charge
-
Significant performance decline
-
Physical damage to battery
-
Overheating during normal use
-
Inconsistent operation despite troubleshooting
-
Typical battery lifespan:
-
Basic pen batteries: 3-6 months with regular use
-
Higher quality variable voltage: 6-12 months
-
Premium batteries: 1-2 years
-
Lifespan varies based on usage patterns and care
-
Choosing a replacement:
-
Consider upgrading to variable voltage for more control
-
Look for features like preheat and battery level indicators
-
Consider size and discretion needs
-
Read reviews for reliability information
-
Proper disposal:
-
Never throw batteries in regular trash
-
Use electronics recycling programs
-
Many vape shops offer battery recycling
-
Some municipalities have hazardous waste collection for batteries
By addressing these common battery issues, you can resolve many situations where your vape cart is not working. In the next section, we’ll explore advanced troubleshooting techniques for more persistent problems.
Advanced Troubleshooting Techniques
When basic troubleshooting doesn’t resolve why your vape cart is not working, it’s time to employ more advanced techniques. These methods can help diagnose and fix more persistent or complex issues that might be affecting your vaping experience.
Using Different Batteries to Test Carts
One of the most effective ways to isolate the problem when your vape cart is not working is to test it with multiple batteries:
-
Why this works:
-
Eliminates the battery as a variable
-
Helps determine if the issue is with the cartridge or battery
-
Different batteries provide different voltage/power levels
-
Testing procedure:
-
Ensure the alternative battery is fully charged
-
Clean the connections on both the battery and cartridge
-
Connect the cartridge to the new battery
-
Test at various voltage settings if available
-
Interpreting results:
-
If the cart works with a different battery: Your original battery is likely the problem
-
If the cart still doesn’t work: The issue is likely with the cartridge
-
If the cart works but performs poorly: Could be a compatibility or voltage issue
-
Community resources:
-
Local vape shops often let you test your cart on their batteries
-
Friends with compatible batteries can help troubleshoot
-
Online forums can provide guidance on compatible battery types
Testing Battery with Known Working Carts
The reverse approach is equally valuable when your vape cart is not working:
-
Testing process:
-
Obtain a cartridge you know works properly
-
Clean the connections on both devices
-
Connect the working cartridge to your battery
-
Test functionality
-
What to look for:
-
Does the battery power the working cart?
-
Is performance consistent or intermittent?
-
Does the battery recognize the cart (indicator light)?
-
Analyzing results:
-
If the working cart functions properly: Your original cart is likely defective
-
If the working cart also fails: Your battery is likely the issue
-
If performance is inconsistent: Could indicate connection or power regulation probl
About the Author

Related Posts

Dosage Guide: How Much THC Should You Consume in Edibles?







Comments